26 Nov Facebook Website Custom Audiences: A Definitive Guide for Remarketing
[ad_1]

[For more on the upgraded Website Custom Audience pixel, read this post.]
The power of Facebook ads is found within the targeting. I don’t care how perfect the ad copy, imagery, bidding and optimization are, it’s imperative that you target the people most likely to perform your desired action.
Who are those people? In most cases, they are those who have visited your website before.
Those who have the most success with Facebook ads have mastered remarketing. Any Facebook advertiser with a website can do this using Website Custom Audiences. And yet, not nearly enough take advantage of this.
Today I conducted a one-on-one with a brand that drives 1 Million visitors to their website every month. This is a treasure trove of targeting opportunities. Yet they spend the vast majority of their budget targeting people who don’t know them.
This is a common story. The purpose of this post is to help clarify the need for website retargeting on Facebook as well as the steps you need to take to start creating Website Custom Audiences today.
What is Website Retargeting on Facebook?
Website retargeting — also known as remarketing — is the process of running ads that target people who have previously visited your website. In this case, we’re speaking specifically of Facebook ads.
You can only run ads targeting people who have visited a website you control. You’ll need to place a snippet of code (also called a “pixel”) on your website that essentially allows you to claim those pages.
Whenever that pixel is fired, Facebook is notified that a user has visited a page of that site. Facebook will then refer to rules an advertiser has created to determine whether that user should fall within a specific audience to be targeted with an ad.
Advertisers create rules that help bucket website visitors into specific audiences based on the specific pages they’ve visited and when that visit occurred. This then allows advertisers to create ads that are perfectly crafted based on a user’s activity on their website.
How to Install the Pixel
All of this is possible thanks to the Facebook Custom Audience pixel. Within Ads Manager, select “Audiences” within the Tools drop-down at the top.
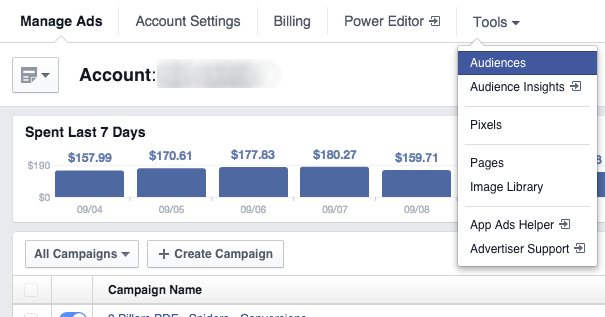
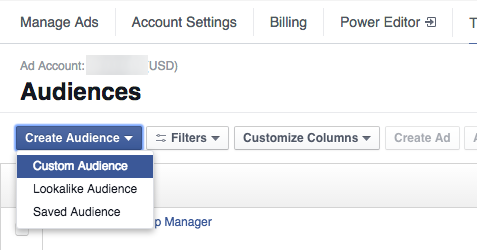
If you’ve ever created Custom Audiences before, you’ll get the following view. Click the “Create Audience” drop-down and select “Custom Audience.”
If you’ve never created a Custom Audience of any kind before, it will look like this…
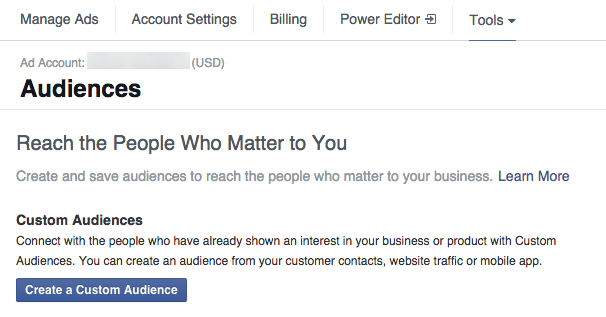
Click the “Create a Custom Audience” button.
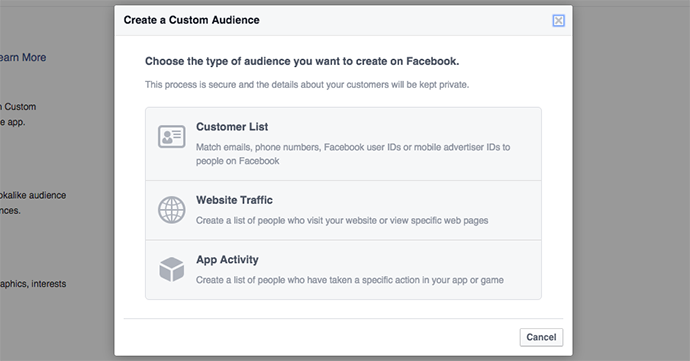
You’ll then get the following pop-over. Select “Website Traffic.”
If you’ve never attempted to create a Website Custom Audience before, you’ll first be asked to accept Facebook’s Terms for Custom Audiences.
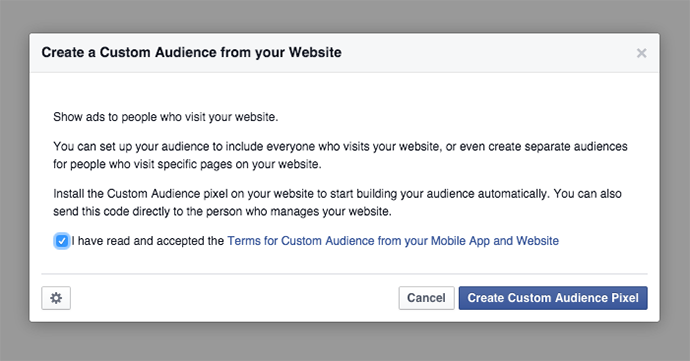
You’ll of course want to check the box to accept those terms and click to “Create Custom Audience Pixel.”
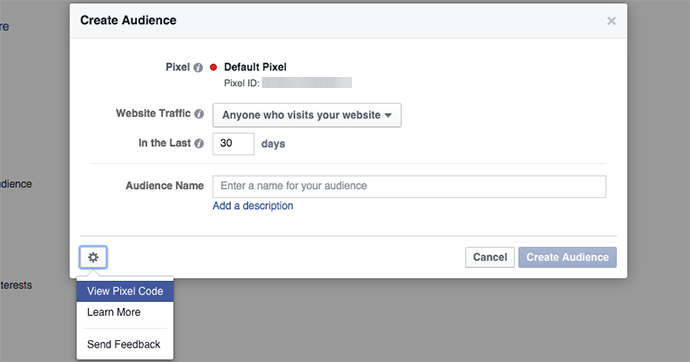
If you haven’t added the pixel to your site yet but are instead immediately taken to the Create Pixel process, click the gear icon at the bottom and select “View Pixel Code.”
You’ll then be given your advertising account’s unique Website Custom Audience pixel.
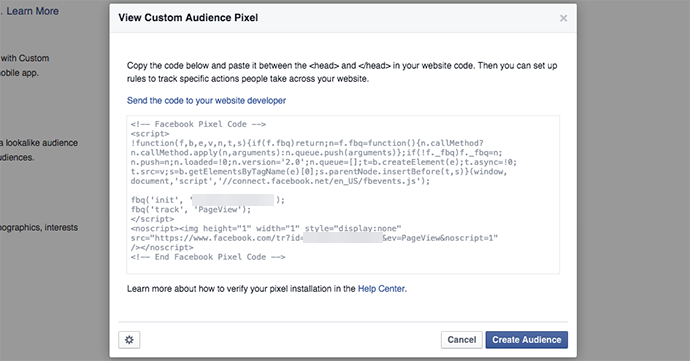
Each ad account gets only one code, so you’ll use this pixel on every page of your website (or websites).
If you are overwhelmed at this point and have someone who manages your website for you, simply click the “Send the code to your website developer” link and Facebook will send everything your developer needs to get it set up.
Otherwise, copy that code and paste it between the HEAD tags of your website’s template. This way, it appears on every page of your site.
There are many different ways you can do this. Here are the main two for WordPress sites:
1) Theme Settings. It all depends on your theme if your settings allow you to add code before the closing HEAD tag of your website. I use Genesis Framework, and my theme settings have a Header and Footer Scripts text box.
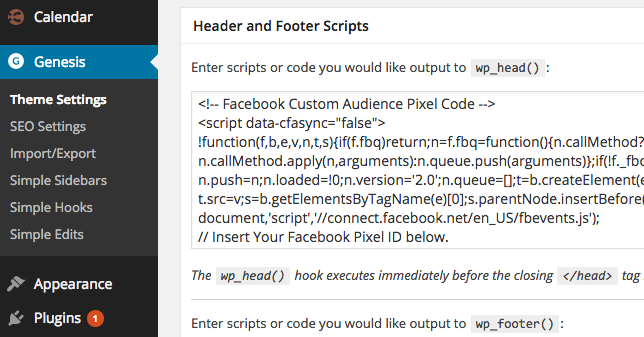
Simply paste the code there.
Genesis also has a Simple Hooks plugin (if you use the Genesis Framework theme). You can paste your pixel within the wp_head hook.
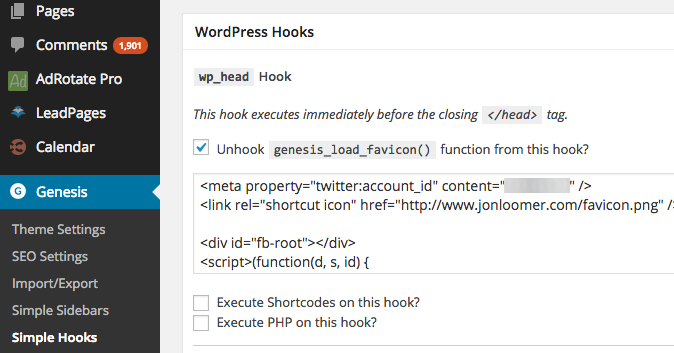
2) WordPress Plugin. There are many different plugins you can use for this. One is Header and Footer Scripts.
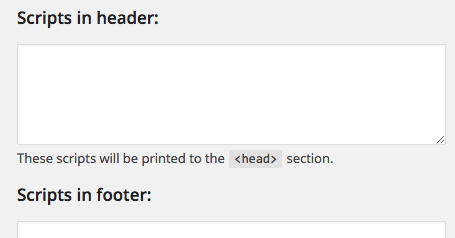
Another is Tracking Code Manager.
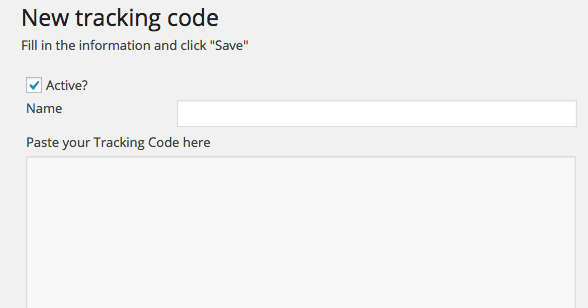
They all do help you accomplish the same task — pasting Facebook’s Website Custom Audience pixel before the closing HEAD tag on the template of your website.
How to Create a Website Custom Audience
Now that the pixel is properly installed on every page of your website, it is time to create some Website Custom Audiences!
Many first time users of Website Custom Audiences get confused here. They think they need to install a different pixel to each page, depending on the audience. Understand that you have only one pixel per ad account, and that same pixel needs to be on all pages of your website (or websites).
Creating the rules — or Website Custom Audience — will determine which website visitors fall into what audiences.
Now let’s go back to the Ads Manager where you had previously copied the pixel code. Click the button to “Create Audience.”
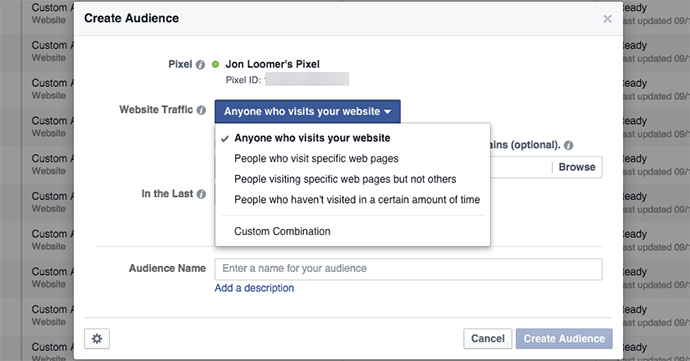
You will have the following options:
- Anyone who visits your website
- People who visit specific web pages
- People visiting specific web pages but not others
- People who haven’t visited in a certain amount of time
- Custom Combination
1) Anyone who visits your website
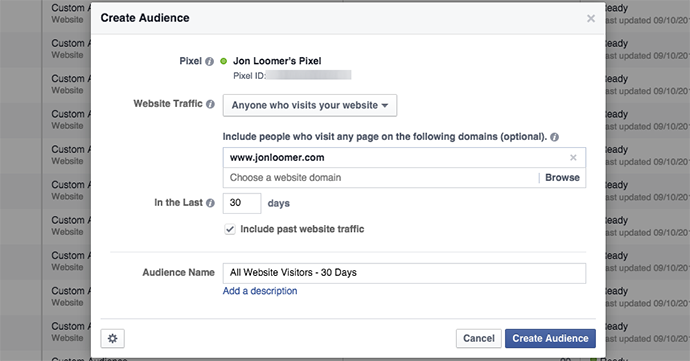
By default, this is the type of audience you will create. I encourage you to create at least one. If your pixel is on multiple domains, select the domain from the drop-down (leave it empty otherwise). Then indicate the window for number of days, include past website traffic and name your audience.
Your duration can be anywhere from 1 to 180 days. Clearly, the shorter the duration the smaller the audience. However, it will also be more relevant.
If you just placed the pixel on your site, you can check the box for including past traffic, but don’t expect it to help.
2) People who visit specific web pages
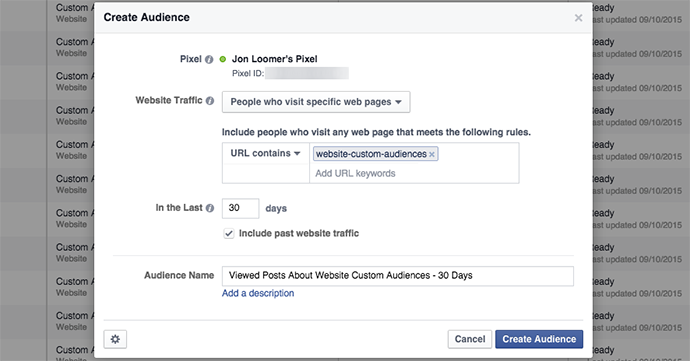
You may want to generate an audience of people who visited a specific landing page, blog post or group of pages for targeting purposes. This is where you’d do that.
Simply enter the URL(s) you want to include. Anyone who visited those URLs will be added to your audience.
Note that there are options for “URL contains” and “URL equals.”
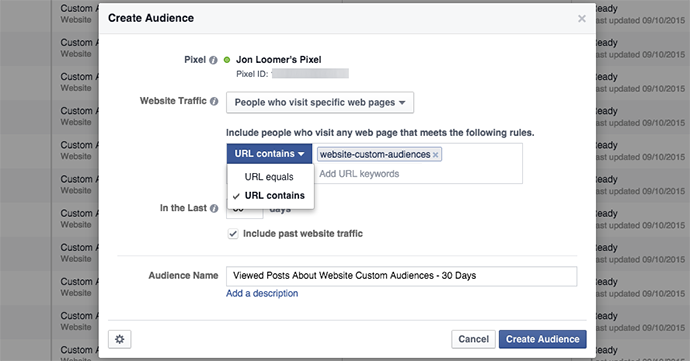
When “URL contains” is selected, you could enter partial URLs to capture visitors to multiple related pages. For example, if I had “website-custom-audiences” in the URL of multiple blog posts, I could build the audience of all people who visited any page with that string in the URL.
Of course, you need to be careful with that as well. You may sometimes include pages you do not mean to include. For example, a product landing page may be http://mydomain.com/product and the success page may be http://mydomain.com/product/thank-you. If you use “URL contains” and the string “product,” you’ll generate an audience of anyone who visits either page.
To fix that, simply use “URL equals” instead and enter the entire URL.
3) People visiting specific web pages but not others
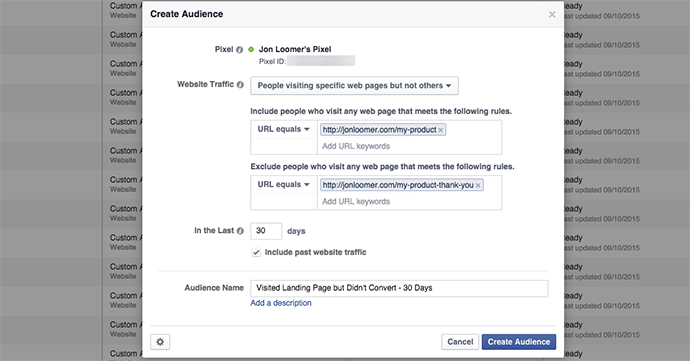
An example of when you’d create this audience is to focus only on the people who visited a product landing page but who didn’t convert (visit the “thank you” page).
Personally, I prefer to create individual Website Custom Audiences for both pages and then choose to target or exclude within the ad set. That allows me to use each audience for multiple purposes.
4) People who haven’t visited in a certain amount of time
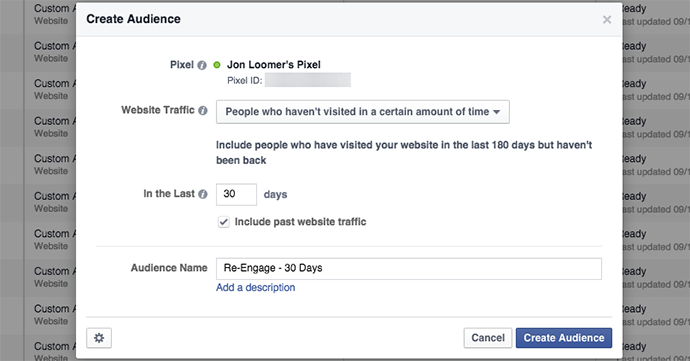
This audience is for re-engagement. It allows you to isolate those people who have visited your site during the past 180 days, but haven’t been back during a certain period of time.
How to Target or Exclude a Website Custom Audience
Once you’ve created your Website Custom Audiences, this process is rather simple.
When creating an ad within Ads Manager, this is done within the “Who do you want your ads to reach?” section.
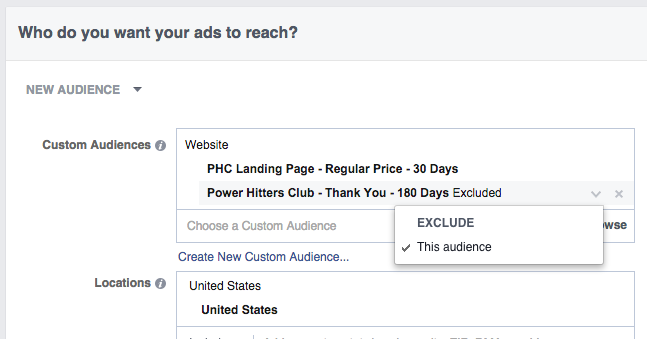
Simply type in the name of the audience you previously created within the Custom Audiences text box. As you type, options will appear.
In the example above, I’m targeting anyone who visited the landing page for my Power Hitters Club membership product, but excluding those who converted.
Note that when you target Custom Audiences, you can choose to remove all geographic targeting. In the example above, I’m only targeting those visitors from the United States, but I could remove that so that country does not matter (this can only be done with Custom Audiences).
If you are creating your ads with Power Editor (you should be!), this will be done within the ad set.
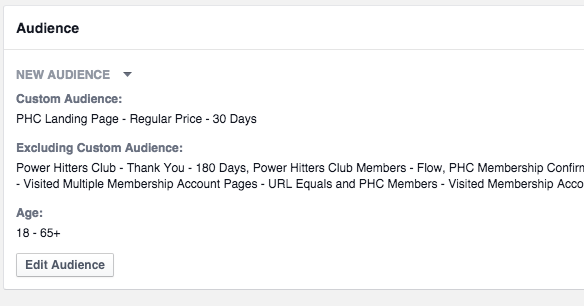
Click the “Edit Audience” button within the Audience section.

Then enter the names of the audiences you want to target or exclude, as we did in the previous example.
Website Custom Audiences You Should Create
I’ve created hundreds and hundreds of Website Custom Audiences (found on the “Audiences” page within Power Editor or Ads Manager). Here are a few examples of Website Custom Audiences you should create…
1) All Website Visitors
This is one I use most frequently. Feel free to create variations based on durations of 1 to 180 days. The ones I target most are 30 or 180 days.
2) Viewed Popular Blog Posts
Every time I publish a new blog post, I immediately create a Website Custom Audience for it (I will for this post, too!). You should get into the practice of that for all future posts, but in the meantime you should do it for your most popular posts.
In this case, I prefer to use a duration of 180 days because we’re starting to limit our audience size.
3) Viewed Category
If your website is broken up by content category and the URL is structured to include that category, it’s a great opportunity to create audiences based on that behavior.
For example, let’s think of a website like Social Media Examiner. They have content about Facebook, Twitter, Pinterest and more. Regardless of whether their URL structure includes those keywords, I imagine blog posts about those topics will always include “facebook” or “twitter” or “pinterest” within the URL.
As with #2, I tend to prefer using a duration of 180 days in this case.
4) Viewed Landing Page
Create a Website Custom Audience for each active product or opt-in landing page, assuming you don’t have dozens or hundreds. Otherwise, focus on five or 10.
You should create various durations because this will have multiple purposes.
5) Viewed Thank You Page
Create the Website Custom Audience of all of those who converted on those same products and opt-ins.
You should almost always use 180 days as your duration here. You’re either cross-selling/up-sellling or excluding someone who purchased a product.
Ways to Use Website Custom Audiences
Website Custom Audiences are incredibly flexible. You can use them for just about any objective. I personally use them for the following…
1) Drive Website Traffic
Driving traffic is incredibly important. One of the primary reasons is to continue building your Website Custom Audience so that you have a larger audience to target for #2 and #4 below.
After I publish this blog post, I’ll promote it to all of my website visitors — probably during the past 180 days. Since I created a Website Custom Audience for this post, I’ll also exclude those who already read it.
2) Build Email List
You can also target all of your website visitors to build your email list. Or you can focus on people who read content relevant to your opt-in.
Additionally, you should always exclude those who already opted in by excluding the Website Custom Audience for the thank you page.
3) Build Fan Base
Not everyone does this, but if you’re going to build a fan base it had better be relevant. Target those who visit your website! These are the people who will actually care — and click — when you share links.
Target all website visitors in this case.
4) Sell Product
You have several options here. You can certainly target all website visitors. That will give you a bigger group to start with.
But if you have a blog post or a category of content closely related to your product, target those who read that content for higher relevance.
You also likely have a funnel starting with lead generation. You created a free offer that is closely related to your product. So target anyone who opted in to that offer (viewed the opt-in thank you page) when promoting the related product.
You may also have cross-sell or up-sell opportunities. So target those who purchased a related or earlier version of the product (targeting those who viewed the related product thank you page).
Another effective approach is targeting those who visited the landing page for your product but didn’t convert (exclude those who viewed the thank you page). In this case, you don’t need to introduce the product to them — they’ve already seen it. But take a different approach!
In all cases when selling this product (especially if it’s a one-time purchase), exclude those who already bought it.
Your Turn
Are you using Website Custom Audiences for Facebook ad remarketing? How are you doing it, and what results are you seeing?
Let me know in the comments below!
[ad_2]
Source link

